Introduction
This is the second part of a series of articles about a case study for a web app implemented using Redux and Angular. The project follows the architecture depicted on a previous article, but reading that article before this one is not necessary.
For easy referencing, here are the articles in the series :
- Case Study pt.1: Planning business logic using Redux
- Case Study pt.2: Implementing Redux on Angular (this article)
- Case Study pt.3: Testing Redux Effects on Angular (to be published)
This project’s web app is an online test (or quiz) which, although functional, is simplified as it only serves as subject for this case study. The project is complete on my repository and these articles focus on the implementation of the business logic using Redux on an Angular web app.
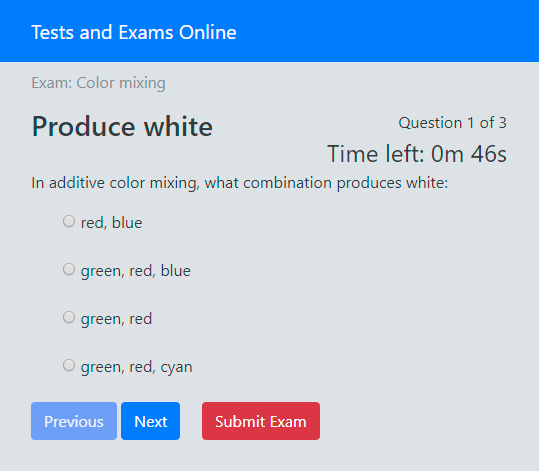
A snapshot of the web app implemented for this series of articles.
Source code on my GitHub repository.
On this article I will explain how the project logic is structured and implemented. Some Redux knowledge is assumed and expect no Angular details here.
Modularity
I opted to isolate the test/exam functionality in an Angular module ExamModule. It’s more clean easier to move to another project. Besides this module is lazy loaded to test its full modularity. Being lazy loaded, the services become isolated from the main app, which is desirable in this case, since this module’s services are not meant to be called from outside the module.
In folder “exam” we have three top files:
- exam.module.ts: Declares all the UI components and make all services available. Normal angular module stuff.
- exam-routing.module.ts: Defines the URLs that load the tree different pages: start, question and result. This project uses “router-store-ser” which provides a serialization for the router in the Redux state. Not important to this article, so see more on that repository.
- module-config.ts: This file is the only place where this module know about its exterior. Besides this file, there is no dependencies to other modules in the app.
The logic has its own module on file “logic.module.ts” where the Redux store is configured and provided and effects are also configured:
@NgModule({
    imports: [
        StoreModule.forFeature(featureName, reducersMap),
        EffectsModule.forFeature([
            RouterOutEffects,
            RouterResultEffects,
            RouterStartEffects,
            RouterQuestionCurrentEffects,
            ExamStartEffects,
            ExamEndEffects,
        ]),
    ],
    providers: [
        {
            provide: MODULE_STORE_TOKEN,
            useFactory: featureSelector,
            deps: [Store],
        },
    ],
})
export class LogicModule {}
Note the provider using the custom token MODULE_STORE_TOKEN. All the exam module code access the Redux store by injecting with this token, this way it has its own isolated state provided by featureSelector:
export function featureSelector(store$: Store): Store
{
    return store$.select(createFeatureSelector(featureName));
}
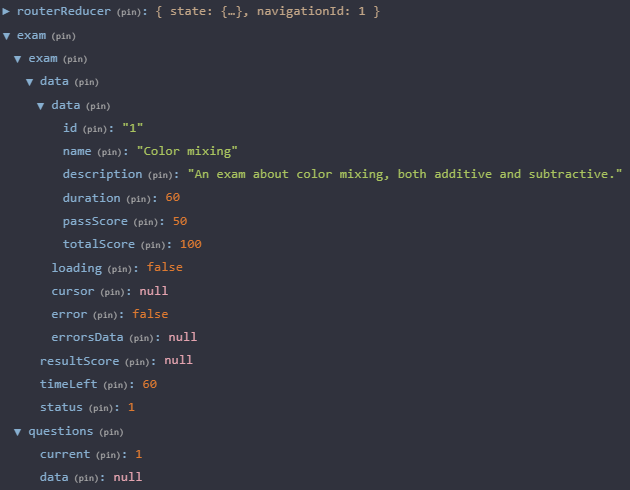
Lets go a little deep down on this by checking all Redux state when the app starts. Let’s inspect this DevTools Extension snapshot:
The top level includes only two properties:
- routerReducer. Created by the app (outside the exam module) for storing the navigation state.
- exam. The top level for the exam module state.
The name “exam” is defined in the file “module-config.ts” (as seen above) and fed into StoreModule.forFeature(featureName, reducersMap) on the module import above. Injecting the store using the custom token MODULE_STORE_TOKEN receive the object at this “exam” top property. That object has two properties: “exam” and “questions”. These two properties are defined by reducersMap:
export const reducersMap: ActionReducerMap<State, Action> = {
    exam: examReducer,
    questions: questionsReducer,
};
The ActionReducerMap is an helper from @ngrx/store to combine reducers, each with its slice of the state.
Structure
Follows a snapshot of the project “exam” folder expanded to show the logic related files and folders:
The “models” folder holds the classes and interfaces that make our business data model. The “logic” folder includes the files for the business logic and lets analyze each one.
State
The file “state.ts” includes the topmost structure for the Redux state “exam” top property as seen above.
import { State as ExamState } from './exam.state';
import { State as QuestionsState } from './questions.state';

export interface State
{
    exam: ExamState;
    questions: QuestionsState;
}

/**
 * This token is used for providing the store fragment that corresponds to this ngModule.
 * So, on this module asking the injector for Store should always ask for this token.
 */
export const MODULE_STORE_TOKEN = new InjectionToken<Store>('ModuleStore');
The token MODULE_STORE_TOKEN was discussed above and is defined here. It could have its own file, but for now that seems an overhead.
Note the import statements. Each state portion defines itself as State leaving to the code that imports it, to rename it matching the property that will be used to store that state.
The file “exam.state.ts” defines the ExamState mentioned in “state.ts”:
export enum ExamStatus { OFF, READY, RUNNING, TIME_ENDED, ENDED }

export interface State
{
    data: AsyncDataSer;
    resultScore: AsyncDataSer;
    timeLeft: number; // seconds
    status: ExamStatus;
}

export const initialState: State = {
    data: null,
    resultScore: null,
    timeLeft: 0,
    status: ExamStatus.OFF,
};
Note that the initial state needed in Redux initialization is also defined here. Speeding up eventual changes to the State interface.
Actions
The actions need only to be a object with a “type” property but declaring them as classes allows for compile-time type checking.
/**
 * Emitted for changing the status of the exam.
 */
export class ExamStatusAction implements Action
{
    public readonly type = ExamStatusAction.type;
    public static type = 'EXAM_STATUS';
    constructor(
        public payload: { status: ExamStatus },
    ) { }
}
The static type property will be used to check if an existing action is an instance of this type of action. Note that actions can come from serialization where “instanceof” operator would not work.
Notice that the payload in the case above seems to be an overhead, as it could be of type ExamStatus directly. I always use an object for the payload. This option is justified by:
- having the property name, adds more semantics to the action payload
- a bit easier to add properties in the future
Reducers
The reducers implementation pretty much follows the standard practice. Let see an excerpt of “exam.reducer.ts“:
export function reducer(state: State = initialState, action: Action): State
{
    switch (action.type)
    {
        case examActions.ExamStatusAction.type:
            return { ...state, status: (action as examActions.ExamStatusAction).payload.status };

        case examActions.ExamDataAction.type:
            {
                let timeLeft = 0;
                const adata: AsyncDataSer = (action as examActions.ExamDataAction).payload.data;
                if (AsyncDataSer.hasData(adata, false))
                    timeLeft = adata.data.duration;
                return { ...state, timeLeft, data: (action as examActions.ExamDataAction).payload.data };
            }
    }

    return state;
}
Note that for actions ExamDataAction and besides setting state, there is the logic indicated in the planning for setting timeLeft.
The other reducers are similar and can be seen on the repository.
Effects
As we have seen in the former article, the effects implement much of the business logic of our app. The procedure is about detecting the action that triggers the effect and emitting new actions in a kind of response. This effects code can make calls to asynchronous services, including server access. Let’s examine the implementation of the effect that ends the exam calculating its score. The effect for the exam start is more complex and its logic would get in the way of explaining the role of effects in the app logic.
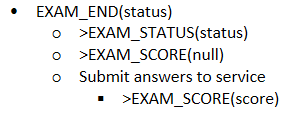
Recalling the planning notes, we have:
Let’s see the implementation on file “exam-end.effects.ts“:
export class ExamEndEffects
{
    @Effect()
    public effect$: Observable;

    constructor(
        private actions$: Actions,
        @Inject(MODULE_STORE_TOKEN)
        private store$: Store,
        private examEvalService: ExamEvalService,
    )
    {
        this.effect$ = this.actions$.ofType(ExamEndAction.type)
            .mergeMap(
                action => Observable.concat(
                    Observable.of(new ExamStatusAction({ status: action.payload.status })),
                    this.store$
                        .take(1)
                        .map(getExamData)
                        .filter(a => a !== null)
                        .mergeMap(
                            ({ examInfo, questions }) =>
                            {
                                return Observable.concat(
                                    Observable
                                        .of(new ExamScoreAction({ score: AsyncDataSer.loading() })),
                                    this.examEvalService.evalQuestions(examInfo, questions)
                                        .map(adata => new ExamScoreAction({ score: adata })),
                                );
                            }),
            ));
    }
}
The ofType() operator filters the observer for the type of actions specified resulting in a new observable that is placed on the effects$ class property. The library @ngrx/effects will take this observable and dispatch its actions until completed by means of the @Effect() decorator.
In response to ExamEndAction, the code emits an ExamStatusAction immediately and then takes the state for the exam and questions info and filters for their availability. The function getExamData() extracts from the store’s state the info we need if available, returning null otherwise.
function getExamData(storeState: State)
{
    if (!storeState.exam || !AsyncDataSer.hasData(storeState.exam.data, false)
        || !storeState.questions || !AsyncDataSer.hasData(storeState.questions.data, false))
        return null;

    return {
        examInfo: storeState.exam.data.data,
        questions: storeState.questions.data.data,
    };
}
Then, the code takes that info and pipes in a concatenation of the action ExamScoreAction with the result of calling examEvalService.evalQuestions() mapped onto an ExamScoreAction action. The evalQuestions() function asynchronously computes the score.
The effect for the EXAM_START is in essence very similar to the effect for EXAM_END just presented. It is a bit more complex, but it really is just more RxJS, fetching questions info from server and producing a timer that can be interrupted if the exam status change in the Redux state. I will not go through that code, since my purpose here is not to show how to use ReactiveX to solve problems, but to show how to apply Redux effects to implement some logic around state and services.
The files “router-*.effects.ts” implement the effects for the navigation actions, indicated in the bottom of part 1 of this series of articles. The only main difference from the exam start and end effects above, is that besides triggering on an action, they inspect the action payload to match the effect. They need to know if the navigation is to a specific page. This is accomplished with the help of a library named “router-store-ser“. See more on that repository.
Summary
In this article, we just saw how to implement business logic in a Redux with effects architecture. Starting from the kind of planning I’ve made (discussed on the previous article) it maps easily. I think the only complex part is the use of ReactiveX to kind of declaratively implement what normally is thought out in an imperative way. A future challenge could be to find a way to do the planning already in a declarative/reactive form, making the implementation really straightforward.
On the next article we’ll see how the all business logic can be unit tested.
Have fun!
PS: This article also appears on Medium.


